

This is a guide mainly to get people to start thinking about MegaSquirt or Microsquirt, it is not meant to be a step by step guide. The information I provided could be wrong, you are using it at your risk.
First thing to do is to decide which MegaSquirt (MS) System is for you. MS is an aftermarket ECU designed to replace your stock ECU.
No more LM, PM, SMEC, nor SBEC! No more HEP!
MegaSquirt3(MS3) have the most features, also most expensive. MS3 firmware are being updated regularly.
MegaSquirt2(MS2) is cheaper than MS3, MS2 firmware (software) is pretty saturated, so expect NO additional features upgrade, even bug fixes can take a long time, it has more custom input/outputs than MicroSquirt.
MicroSquirt(µS) is a compact but it has the least features and no upgrade capabilities. It only has two customizable inputs and two customizable outputs. It also uses MS2 firmware.
Read the MS EXTRA manuals first! Specially on the table that list all the input/outputs! http://www.msextra.com/manuals/ DO NOT just depend on the vendor's website!
Decide what features you want BEFORE you buy anything. If you want more than basic engine control, I would suggest spend the money for MS3. If you want to use 4 wire stepper idler, buy the MS3. If you want traction control, anti-lag, torque converter, or vehicle speed, buy the MS3. If you want check engine code, limp mode, etc, buy MS3. Remember, there is NO OBD II support and MS is not technical street legal and it will never be.
Here are some of the features available to MS.
Waste spark coil pack, COP, wasted COP
Batch injectors firing, sequential injectors firing
On/off idle valve, PWN idle valve, stepper idle valve
Boost control
2 step/3 step/trans brake launch control
Ethanol sensing
Knock control
Fan control
A/C cut out control
A/C on/off detection
Alternator control (MS3 only)
Traction control(MS3 only)
VVT control (MS3 only)
Anti-lag (MS3 only)
Torque Converter Lock up (MS3 only)
Shift Light
Vehicle speed (MS3 only)
The list goes on.
There are assembled MS3, MS2, and µS, and there are also un-assembled kits for them.
If you're good with soldering, you may consider the kits. If you're bad with soldering, you may want to pay more and buy an assembled unit.
I wanted simple and easy. I am terrible with solder I went with an assembled µS. No solder at all, just crimping wires with uninsulated butt connectors then shrink wrap.
Once you decided what MS to buy and what features you want for your car, then you can start collecting/buying all other sensors/connectors/tool/etc.
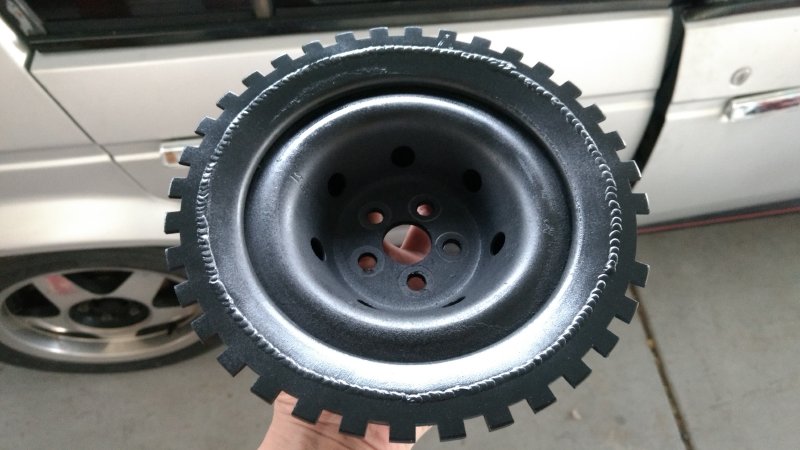
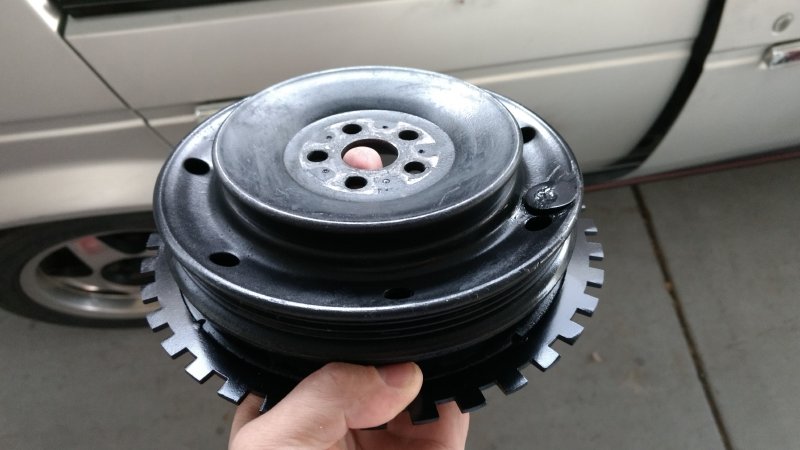
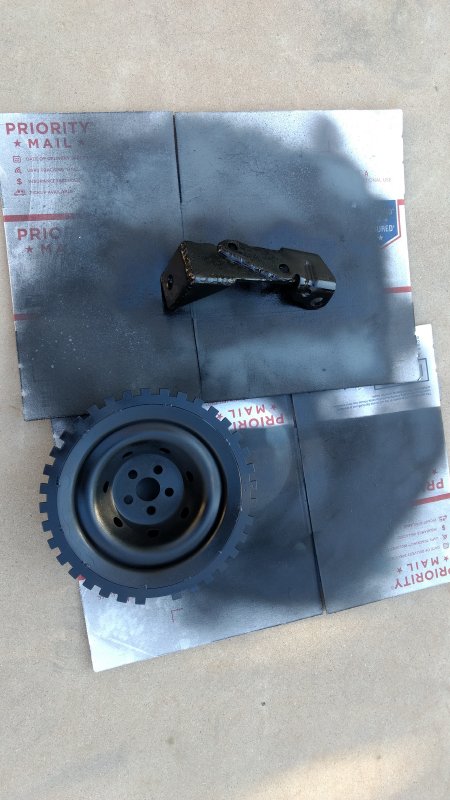
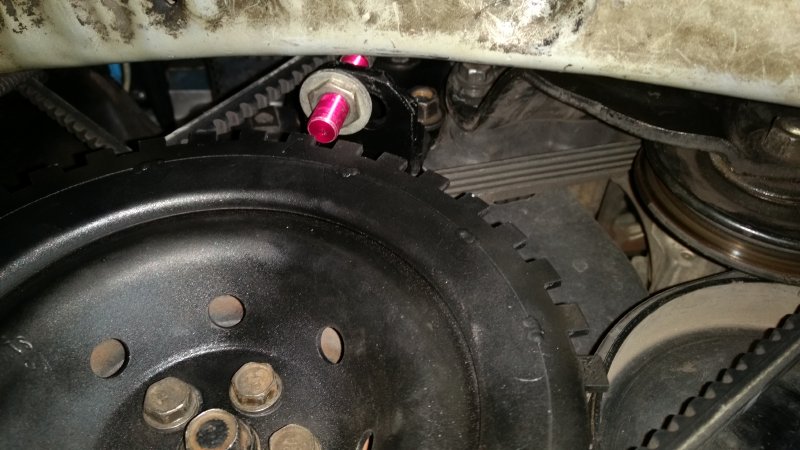
Since MS does not work with the Dodges HEP, you will have to find an alternative way to measuring crank rotation. I choose to have a 36-1 wheel ring cut out by waterjet, fully welded it to my crank pulley, then zero balanced it by a shop. For the crank sensor, I added material to the mount mount bracket and drilled a hole to mount my red body crank sensor, sold by DIYAutotune. https://www.diyautotune.com/product/...sition-sensor/
Since I only wanted wasted spark and batch injectors firing, I did not need a cam sensor. You will want a cam sensor for COP and\or sequential injection.
Fully welded 36-1 wheel ring to crank
Balanced by a shop for $80
Crank sensor bracket made.
Crank sensor air gap
You want it close, almost touching. Specs will be on the crank sensor vendor page. My red body crank sensor wants 1.5 mm.
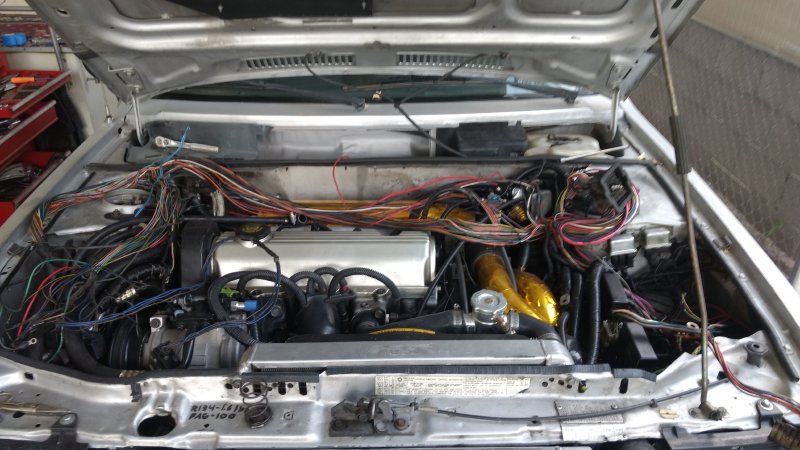
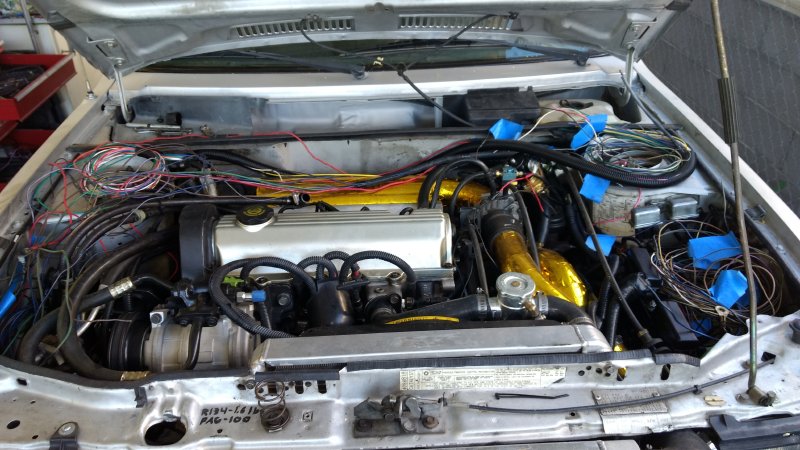
The rest is just easy wiring, given that all wires are color coded. I separated the engine wiring (wires that goes from LM/PM) from the body wiring and keeping the headlights, signals, a/c cut out, a/c compressor, 1 wire coolant temp sensor, starter relay, starter, radiator fan, radiator fan relay, speed sensor, alternator wiring, etc. I also added a relay and a 8 blade fuse box for my µS, relay is driven by the ignition 12v. You may want to keep the fusible links or you can take the advantage to upgrade.
http://minimopar.net/electrical-links.html
I mainly used this to help me decide which wire to keep.
http://minimopar.net/ecu/index.html
LABELING is the key
Now, Im going into setup that was specific to my car. Everyone's setup will be different!!!
Ignition
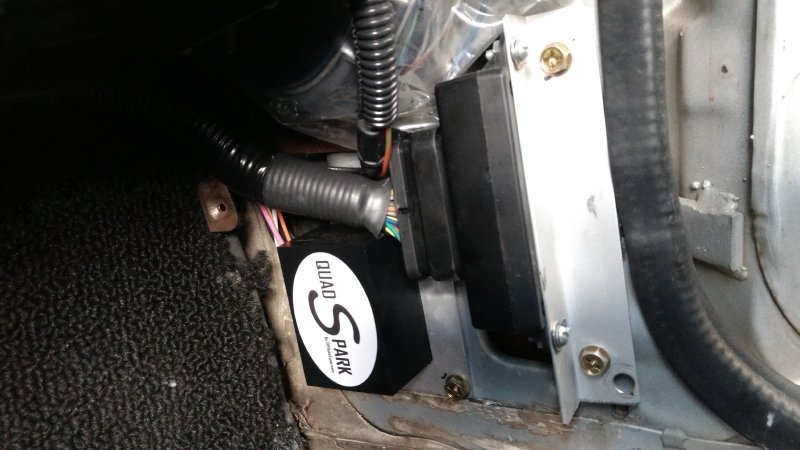
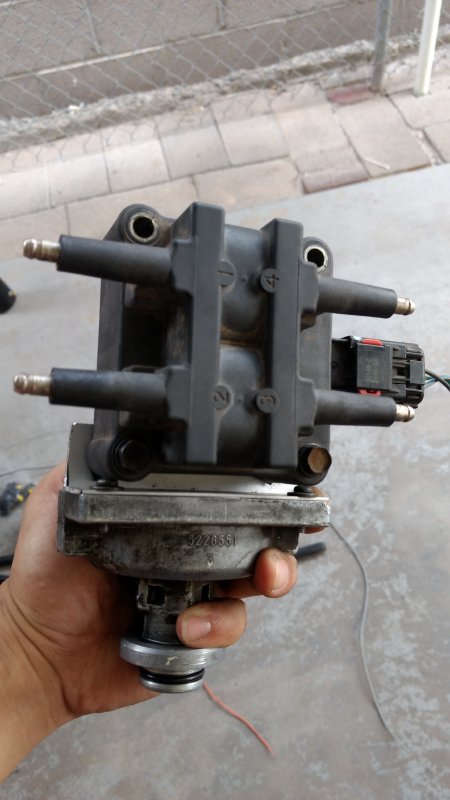
MS can support many type of ignition module. I used a QuadSpark and 420A coil pack for my wasted spark. QuadSpark likes to be cool, so I mount it inside the cabin, next to my µS.
All moving parts removed from the distributor.
https://www.diyautotune.com/product/...nition-module/ (Support four ignition channels, Im only using two.)
Very important!!! MS want resistor spark plug and resistor spark plug wires. NO AR51 or other non-resistor plugs!!!! Very important!!!
Injectors
Turbo Dodge natively uses low impedance injectors. While MS can use both Low Impedance (low-z) and High Impedance (high-z) injectors, you may need additional hardware to get MS to work with all four low impedance injectors. Some like to use peak and hold injector driver, I used a resistor pack from a Volvo 740 Turbo 0 280 159 018. Resistor was $30 shipped from Volvo board.
MS2 and MS3 can support sequential injectors firing, you may need additional hardware. My µS can only support batch injectors firing. I wired cylinder one and four injectors together, number two and number three together.
Injector Sizing
What size injectors do you need? Well, that would depend on how much HP you want to have and what RPM you want to go to, and what type of fuel you want to use.
For example: I am at 82% duty cycle with 72 lbs injectors using E54 fuel at 7000rpm and 24psi. So if I want more boost or more RPM, Ill need bigger injectors to stay with that 80% duty cycle range.
Id advise to go BIG on injectors rather than small. Want 20psi? Go 72 lbs. 25 psi? Go 95lbs. 30psi? Go 120lbs 35psi? Go 140lbs.
Idle control
MS can use three different types of idle control: stepper motor (4-6 wires) , pulse width modulation (PWN) valve (2-3 wires), and on/off valve/solenoid (2 wires).
Dodge uses a four wire stepper motor with lots of adjustment available, and the stepper motor is installed at the throttle body.
Many European car uses a PWN idler valve plumb directly to the intake manifold to bypass throttle body all together, my Volvo 850 is like that.
Some older cars may uses an on/off idle system just for cold start. I know at least one VW do that.
MS can take the advantage of the wide range of adjustment for both stepper motor and PWN idler and do a close loop feedback for the ideal RPM at whatever engine condition: cold start, coming to a stop, a/c compressor coming on, low battery voltage, hold RPM while you shift, and etc.
On/off valve/solenoid is just that, on or off, with no adjustment. It is a open loop, and MS doesn't monitor it. MS default is to have the on/off valve to be on when coolant temperature is below 140F, and shut the valve off after that, and that is it. It is basically a controlled vacuum leak to achieve a higher idle RPM.
I use a BOSCH PWM idle valve, great range and easier to use with a/c than an on/off valve.
Knock Control
One of my spare input is wired up with knock sensor input. MS2/Microsquirt only accept knock sensor with a knock module, and most of the knock modules has only a output of 0-5V digital on/off. I wanted something more, and I found lilknockmeter.
Some of the features of lilknockmeter are:
A set of LEDs from green to yellow to orange and red, giving you the severity of knocks (LED lights is adjustable via software)
Audio jack output (use headphone to listen to knock!)
0-5v on/off digital output
0-5v analogue output
Software to calibrate the lilknockmeter
I was very happy to find lilknockmeter, you will not find another product with all these features and this low price! Product is made in California, great support from the Leonard, the lilknockmeter creator!
I used the parts below for my install.
A knock module call lilknockmeter made by http://www.insaneimportperformance.com/
a VW BOSCH knock sensor 0261231038 (3 wire knock sensor, signal, ground, and ground for the shielding)
VW N90905502 m10x1.5 to m8x1.25 stud, $2-$3 at VW dealer
M8x1.25 washer
M8x1.25 nut
3 wire BOSCH sensor connector
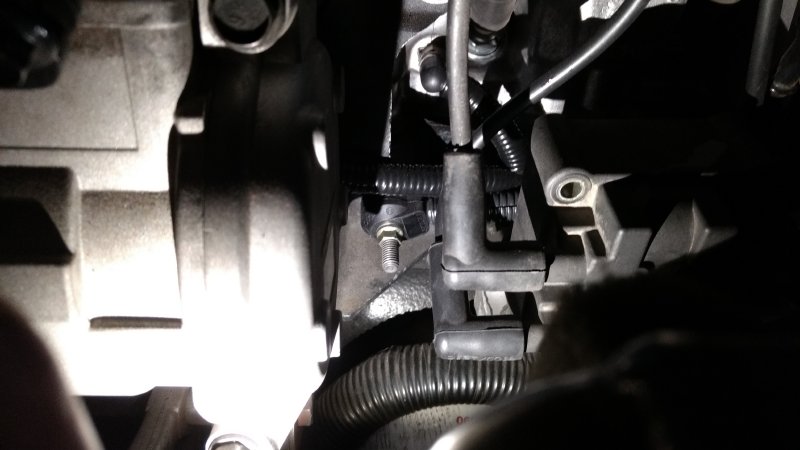
Stock Chrysler knock sensor is mounted on the intake manifold between number 2 and number 3 runner.
The knock sensor is now mounted at the AC bracket at the block between the 1st and 2nd cylinder.
Lilknockmeter is wired up in the car with 12v, ground,0-5V analogue going to Microsquirt, and the shielded cable going to the knock sensor.
My current lilknockmeter software settings are
Frequency = 6.64kHz (I used this to calculate knock frequency https://www.phormula.com/KnockCalculator.aspx)
Gain = 2.0
Time = 240
Threshold = 0500 (0 to 1024 range, corresponds to 0-5V)
Cylinder = 4
Leonard (creator of lilknockmeter) suggested to rev the engine in natural to your max RPM with no load and see what noise the knock sensor will picked up, I did and and the result was 33.9% (0% is 0v, 100% is 5v) was the highest noise with no load.
Then, set the knock threshold to be slightly higher than the highest point.
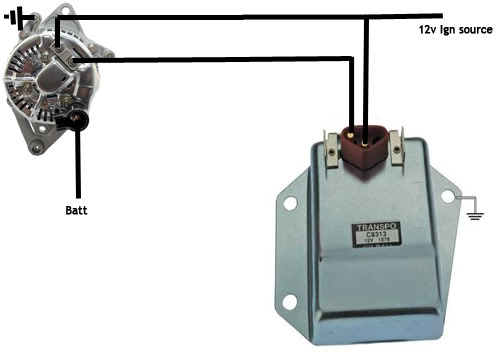
Alternator Control
I wired my alternator to an external voltage regulator. 2 wires, easy and simple!
Fan Control
One of my two spare output is hooked up to the fan relay. MS ground the wire of the relay to turn on the fan. I used TunerStudio to programmed the fan to come on at 200F or MAP sees 120 kPa. My fan will also come on when the a/c compressor is turned on, that function is hardwired to the A/C relay from factory.
Boost control
I have a HDi electronic boost controller to control my boost. You may choose to use MS, standalone electronic boost controller, or a manual boost controller to control your boost. For the adjustability, nothing beats a standalone electronic boost controller. Turn a knob for 9psi, hit a button and turn another knob, I am at 24psi within seconds!
A/C detection
Set to detect A/C on/ff so Microsquirt can raise idle.
A/C cut out control
One of my two spare output is hooked up to the a/c cut out relay so MS can control when a/c is on/off.
2 step stop launch control and flat shift
2 step launch control is basically a rev limiter that you preset to whatever RPM you want to launch your car at. It is engage that by pressing a button or switch, my switch is mounted onto the clutch and it is activated by stepping on the clutch pedal
Flat shift means when shifting a manual transmission, your throttle foot stay WOT and never lift. With flat shift is engaged (clutch pressed in), RPM will be limited to whatever you preset value is, so this keep the turbo spooled during a shift in a manual car.
Tach output
I was able to wire the tach output from µS directly to my digital dash, and it works!
Flex fuel control
I used a GM flex fuel sensor 13577429, WARNING, Flex Sensor is not smooth out in the current MS2 firmware nor MS3 firmware older than 1.5.1, do not use auto flex fuel correction!
Fuel pump control
I wired it up to my addition fuel pump relay, so µS can control fuel pump directly.
Oxygen sensor control
I setup my AEU UEGO to 0-5 and wired it directly to µS.
As for my total related MicroSquirt cost, things like AEM UEGO, external voltage regulator/connector, 3 bar map, injectors connectors, & etc not included since I already have them.
MicroSqurit Total Cost -$1,470
36-1 wheel welded to crank -$100
Microsquirt + 8 ft harness -$369
36-1 wheel -$32.00
crank sensor -$43
QuadSpark -$89.00
MAP sensor connector -$8.50
MAT sensor connector -$10.00
ECT sensor connector -$10.00
TPS sensor connector -$10.00
420A wires -$20
420A coil -$20
Wiring Connector packs -$30
USB to serial -$15
Misc wires -$40
Uninsulated crimp -$20
Crimp tool -$13
Shrink Wrap -$10
Misc bolts -$15
Relay -$15
Fusebox -$25
Fuses -$5
E85 sensor + connector -$80
Injector resistor -$30
Wire loop -$20
On/Off 12v valve for idle control -$30
3m tape -$6
Tuner Studio and Megaviewer -$79.95
lilknockmeter -$119.95
BOSCH knock sensor 0261231038 -$25.00
TPS connector for knock sensor -$11.95
Balanced crank pulley -$74.31
step down stud for knock sensor N90905502 -$2.49
Can I do it cheaper if I go back in time? Probably $100 cheaper since I know what not to buy (knocksense, extra connectors), but really not much more.
Software wise, TunerStudio (TS) is for tuning and Megalog Viewer (MV) is for viewing the log. I will have to write about tuning with TS and MV another day.
Questions are welcome. If I can't answer it, I'm sure someone else with MS can.

 Reply With Quote