Page 1 of 7 12345 ... LastLast
Results 1 to 20 of 130

Thread: 86 Shelby GLHS #408

  1. #1
    turbo addict Turbo Mopar Contributor
    Join Date
    Dec 2005
    Location
    Walkersville, MD
    Posts
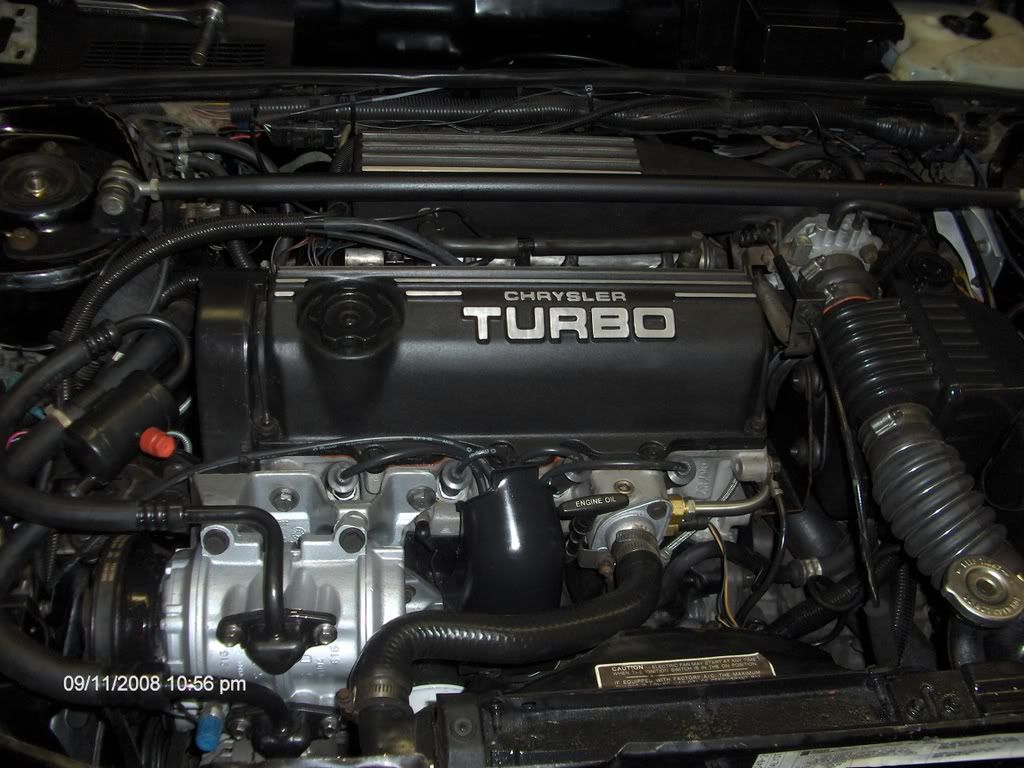
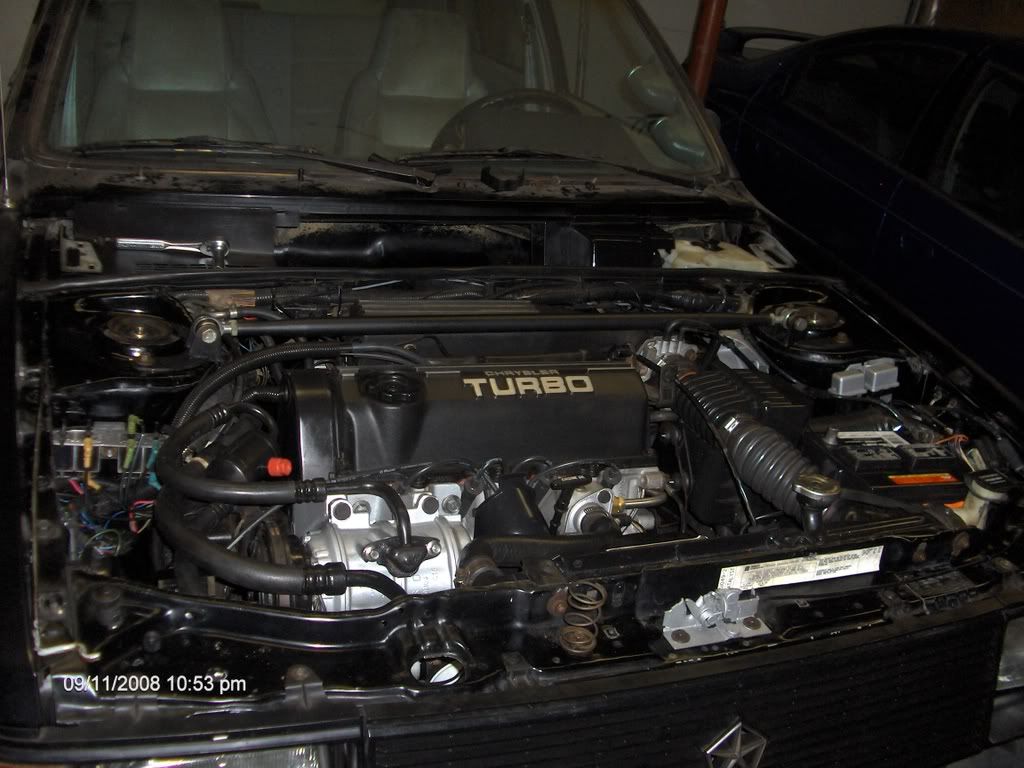
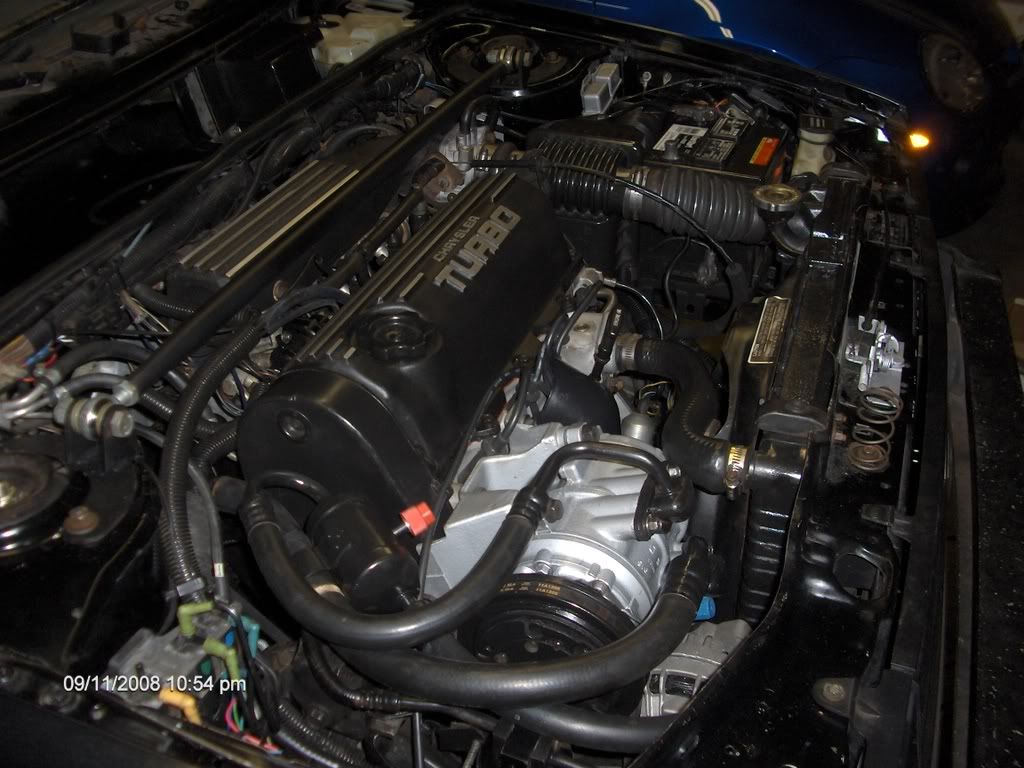
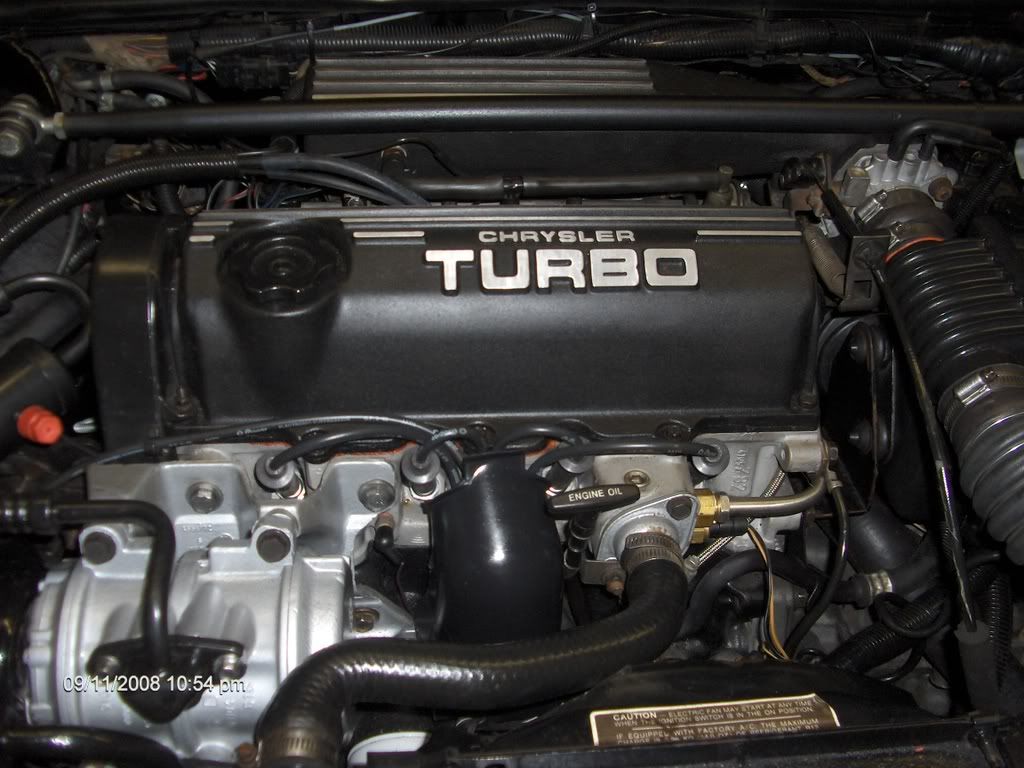
    1,805

    86 Shelby GLHS #408

    In 2004 my aunt and uncle moved to a new condo in Perry Hall, MD. My parents and aunt/uncle alternate Thanksgiving & Christmas every year and that year it was my aunt/uncle's turn to host Thanksgiving. This particular year I rode with my parents, which allowed me more time to mindlessly gaze out the back seat.

    As I'm doing this, about 2/10s of a mile from my aunt's which I've never been to before, I see what appears to be a GLH Turbo in a backyard. I ask my Dad to turn around for another look and he obliges despite loud protests from my Mom. We get a second look and .... what is that, are those Centurions on there?? Is that a GLHS??? It certainly was an 86 GLHS.

    On the way home I write down the address of the house. I get home, do a reverse phone number look up using 411.com and sure enough the number comes up! It took several calls to finally catch the owner, but when I do I find he is thinking about buying a house and may want to sell. He knows what the car is, knows Cliff Sebring, and was involved in SDAC years back.

    My dad and I go back out there, check the car out. It's solid, a little spot of rust on the driver's side frame rail, needs interior work/paint, but seems to run well. I want it but the owner isn't sure what it is worth, so he wants a week to figure out what a fair price is. He gets back in touch with me and we agree to a price. A friend with a rollback picks the car up for me right after Christmas and brings it to my house. I post my purchase on TD and someone posts this:

    "Was this Rob's car?

    <answering own question> It had to be. I stopped by Saturday around Noon and his Aunt said someone just left with it.<end of answering own question>

    I stopped by and bugged him to buy it over the past 3-5 years but haven't stopped by over there in about 1.5 years. I guess I should have stopped by sooner. Nice find. It had rust last time I saw it, and that was the one thing I really did not like about it...but sometimes rust free cars are hard to find around these parts.

    Good thing I did not stop by a few hours sooner!"


    Whew that was close! With the car home I parked in my back garage until I could get to it as I was working on other projects at that time. In July 2006 I pulled it out and started messing with it. The first project was to restore the wheels and give it a good bath. Here are some pics from July 2006.

    Click image for larger version. 

Name:	GLHS right.jpg 
Views:	318 
Size:	21.8 KB 
ID:	28269Click image for larger version. 

Name:	GLHS left.jpg 
Views:	304 
Size:	19.4 KB 
ID:	28270
    [B]Scott[/B] 86 GLHS #408 88 Shadow ES 92 Spirit R/T 04 SRT-4

  2. #2
    turbo addict Turbo Mopar Contributor
    Join Date
    Dec 2005
    Location
    Walkersville, MD
    Posts
    1,805

    Re: 86 Shelby GLHS #408

    Stripping and polishing the wheels are a lot of work. I've done this several times and find the following process to work fairly well.

    1) Strip clear coat using Aircraft Stripper in a spray can or TalStrip which comes in a big jug. This is NASTY stuff, wear gloves and a mask when using. You want to have the tires off the wheels if possible and the wheel weights removed. Coat the wheels in the stripper and it will start to peel up the clear coat. You may have to do several coats, it is tedious.
    2) Use a power washer to wash the stripper off. Make sure you protect your eyes. If spots are left re-treat them with stripper and repeat. Get all the clear off. The power washer is also good at getting brake dust grime off the wheel inserts.
    3) Start wet sanding. I go from 180-320-400-600-800-1000-1500-2000. Yeah, it's tedious, but it works. Others may have a more expedient method using drill attachments, I've just had good luck over the years with this method.
    4) Once the wet sanding is done, polish the wheel using Mother's aluminum wheel polish. I use a buffing wheel on a drill. This brings the shine out.

    Some pics of the finished product.
    Attached Thumbnails Attached Thumbnails Click image for larger version. 

Name:	Centurion1.jpg 
Views:	186 
Size:	20.5 KB 
ID:	28271   Click image for larger version. 

Name:	Centurion2.jpg 
Views:	198 
Size:	21.3 KB 
ID:	28272  
    [B]Scott[/B] 86 GLHS #408 88 Shadow ES 92 Spirit R/T 04 SRT-4

  3. #3
    turbo addict
    Join Date
    Dec 2005
    Location
    Pickering, ontario
    Posts
    2,670

    Re: 86 Shelby GLHS #408

    Thoso look great! I bet you have some impressive blisters!

  4. #4
    turbo addict Turbo Mopar Contributor
    Join Date
    Dec 2005
    Location
    Walkersville, MD
    Posts
    1,805

    Re: 86 Shelby GLHS #408

    Quote Originally Posted by shadow88 View Post
    Thoso look great! I bet you have some impressive blisters!
    Yeah, that usually results in some nice blisters but there are certain parts of the wheel you can really only do by hand. The other thing that has resulted in blisters is the side moldings, which I'll be covering in an upcoming post.
    [B]Scott[/B] 86 GLHS #408 88 Shadow ES 92 Spirit R/T 04 SRT-4

  5. #5
    turbo addict Turbo Mopar Contributor
    Join Date
    Dec 2005
    Location
    Walkersville, MD
    Posts
    1,805

    Re: 86 Shelby GLHS #408

    After getting the wheels done and new tires on, the next steps were to get the car roadworthy. The previous owner told me that the car had two problems, that it would randomly stop running and the headlights would randomly go out.

    I worked on the headlights and found that the high beam switch had some issues. To be safe I replaced the high beam switch and the headlight switch. Problem solved.

    The cutting out problem I assumed to be the hall effect pickup. But since I didn't know how old the fuel pump was, I went ahead and replaced the fuel pump. That problem was solved. So I got historic tags (at that time, MD law said the car must be 25 years old or could be 20 yrs old and would qualify if less than 1000 were built, it took some frustration but MVA finally granted me the historic tags) and took the car for an inaugural spin.

    The first spin didn't go so well. It was making some horrific noises when I got into the throttle. It sounded like bearing noise. The power steering didn't work either. I decided to put a new alternator and water pump on because the car had 86k on it and it sounded like one of the two had failed. I also put on a new ps pump. I was a little irritated when the noise was not gone and the power steering still did not work after changing these parts. I next felt the shaft play on the turbo and it was terrible. The wheel was grinding against the inside of the housing. So off came the head, and a used Garrett I had went, as did a new head gasket, bolts, and timing belt.

    I finally got a successful drive out of the car after replacing the turbo. It ran well, but other issues cropped up. In addition to the power steering not working, the suspension was in sorry shape. It felt like two of the four Koni's were blown, the car felt horrible. I drove the car this way for a few months though because I was so excited just to have it on the road. The next step was the suspension and steering rack.
    [B]Scott[/B] 86 GLHS #408 88 Shadow ES 92 Spirit R/T 04 SRT-4

  6. #6
    turbo addict Turbo Mopar Contributor
    Join Date
    Dec 2005
    Location
    Walkersville, MD
    Posts
    1,805

    Re: 86 Shelby GLHS #408

    I thought doing the steering rack would be pretty straight forward. As usual WRONG

    I got the k-frame lowered and inside the driver's side frame rail there was some rust. I started working at it and .... the hole got bigger and bigger. Before I knew it I had two fairly sizeable holes where I'd cut all the cancer out of it.
    Attached Thumbnails Attached Thumbnails Click image for larger version. 

Name:	glhs frame 1.jpg 
Views:	222 
Size:	48.7 KB 
ID:	28337   Click image for larger version. 

Name:	glhs frame 3.jpg 
Views:	263 
Size:	47.0 KB 
ID:	28338  
    [B]Scott[/B] 86 GLHS #408 88 Shadow ES 92 Spirit R/T 04 SRT-4

  7. #7
    turbo addict Turbo Mopar Contributor
    Join Date
    Dec 2005
    Location
    Walkersville, MD
    Posts
    1,805

    Re: 86 Shelby GLHS #408

    I set about making some patch panels out of black steel that I got from a local welding shop. I used 1/4 on the lower hole and 1/8 on the inside hole. Fabricating the panels was time consuming and took a lot of trial and error.
    Attached Thumbnails Attached Thumbnails Click image for larger version. 

Name:	glhs frame 4.jpg 
Views:	163 
Size:	17.7 KB 
ID:	28339   Click image for larger version. 

Name:	glhs frame 5.jpg 
Views:	166 
Size:	15.9 KB 
ID:	28340  
    [B]Scott[/B] 86 GLHS #408 88 Shadow ES 92 Spirit R/T 04 SRT-4

  8. #8
    turbo addict Turbo Mopar Contributor
    Join Date
    Dec 2005
    Location
    Walkersville, MD
    Posts
    1,805

    Re: 86 Shelby GLHS #408

    The next step was to con Troy (turbojerk) into coming down and welding the patch panels in. Big props again to T-sizzle for coming down and bringing his welder and patching this up for me. I used some JB waterweld in the one spot to level out where the patch was a little lower than the rail, painted it, and hit it with undercoat (the car was factory undercoated) and it looks good as new.

    While the k-frame was down, I also put in new ball joints and polybushings, and pulled the Konis for new KYBs so the car could be driven until I got the Konis restored.

    The original steering rack I took to Napa. It was sent away to be rebuilt and came back in a couple of weeks.

    While I was at it I also put MP motor mounts in.
    Attached Thumbnails Attached Thumbnails Click image for larger version. 

Name:	glhs frame 9.jpg 
Views:	174 
Size:	44.8 KB 
ID:	28341   Click image for larger version. 

Name:	glhs frame 11.jpg 
Views:	198 
Size:	16.1 KB 
ID:	28342   Click image for larger version. 

Name:	glhs frame 13.jpg 
Views:	174 
Size:	17.5 KB 
ID:	28343   Click image for larger version. 

Name:	glhs frame 6.jpg 
Views:	153 
Size:	48.2 KB 
ID:	28344   Click image for larger version. 

Name:	glhs frame 7.jpg 
Views:	157 
Size:	35.8 KB 
ID:	28345   Click image for larger version. 

Name:	glhs frame 12.jpg 
Views:	164 
Size:	20.3 KB 
ID:	28346  

    Click image for larger version. 

Name:	glhs frame 8.jpg 
Views:	150 
Size:	36.0 KB 
ID:	28347   Click image for larger version. 

Name:	glhs frame 10.jpg 
Views:	181 
Size:	18.4 KB 
ID:	28348  
    [B]Scott[/B] 86 GLHS #408 88 Shadow ES 92 Spirit R/T 04 SRT-4

  9. #9

    Re: 86 Shelby GLHS #408

    Nice save. I didn't know NAPA would rebuild a rack. Good to know.

  10. #10
    turbo addict Turbo Mopar Contributor
    Join Date
    Dec 2005
    Location
    Walkersville, MD
    Posts
    1,805

    Re: 86 Shelby GLHS #408

    After getting the car back together from the rust and suspension repairs, I drove it that way for about another 12 months. At that point a couple of other problems developed. First, putting the Stage II LM in caused the clutch to slip at 14psi. Second, the car started to become darty when stopping. The last thing was one of the injectors started leaking and leaving fuel puddled on top of the intake.

    This became a classic "one thing leads to another" instance. First, the drivetrain came out. Then instead of reinstalling the original #s matching engine, the built 89 2.2 T2 I had for another now departed project car went in along with a new clutch, moly plate, and girdle for the 525. I decided to keep the 525 because I neglected to mention in an earlier post that one of the other initial things I did to the car to get it on the road was convert the linkage to heim joints.

    With the engine out of the car, I was able to detail the engine bay. I wanted to keep the original paint, but it was covered by that Rusty Jones undercoating. A lot of patience, a rag, and brake cleaner got it all off.

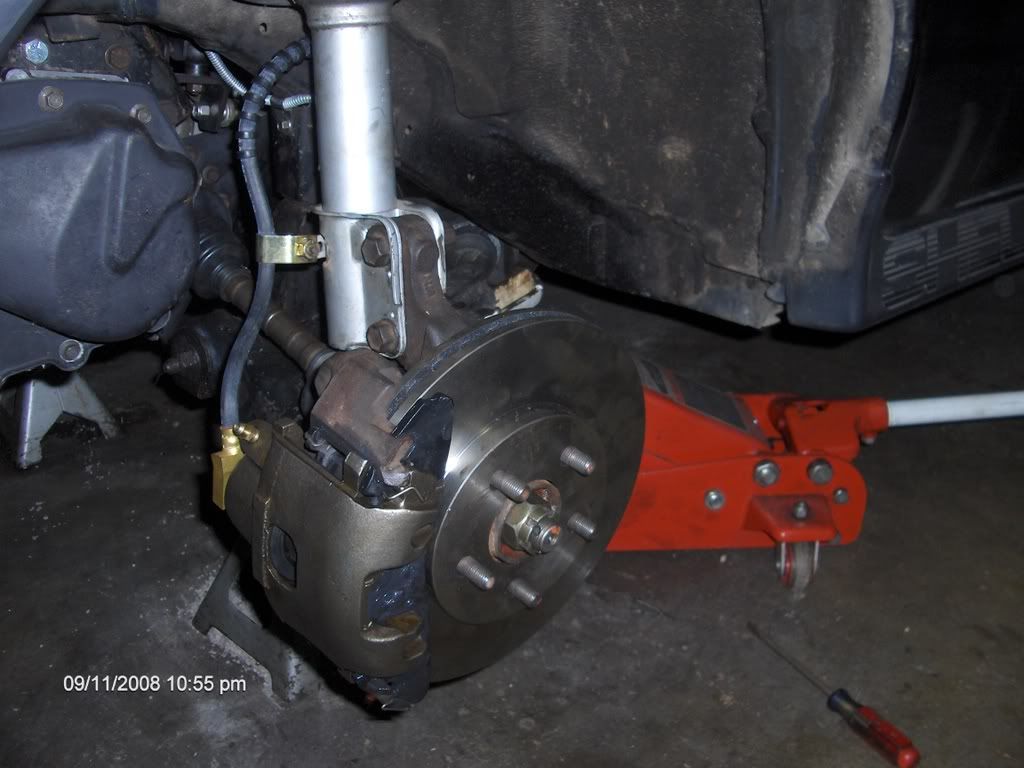
    With the engine out, I could also get to that one pesky brake line that goes across the firewall, so in addition to upgrading the front brakes to SLH 1 I also replaced all the rubber and metal brake lines. The metal lines were time consuming as I had to make them all, but it was worth it.

    Here are some pictures - note that I subsequently replaced the black Turbo valve cover with a Shelby valve cover.


    Last edited by ScottD; 01-24-2011 at 02:25 PM.
    [B]Scott[/B] 86 GLHS #408 88 Shadow ES 92 Spirit R/T 04 SRT-4

  11. #11
    turbo addict Turbo Mopar Contributor
    Join Date
    Dec 2005
    Location
    Walkersville, MD
    Posts
    1,805

    Re: 86 Shelby GLHS #408

    Once the drivetrain was in I thought I was done for a while. Wrong.

    The first problem I discovered was one of the freeze plugs was leaking. Thankfully it was the one on the front of the block by the distributor. It was a real pain to get out, but I was able to get that resolved.

    Next I had an oil leak. It looked like the oil pan was leaking. After replacing the oil pan gasket twice, it turned out that what was leaking was the intermediate shaft seal. It got pinched on re-installation and oil was running down the pan, making it appear the pan was leaking.

    After that the car wouldn't idle, it kept idling at 2000rpm. I was beginning to think the car was cursed or just liked the garage so much it didn't want to leave. The idle problem drove me crazy for a bit. I found a frayed wire at the speed sensor, and fixed the wiring and installed a new speed sensor. I tried a different TPS and AIS. I tried a different LM. Nothing seemed to work. I had gone over the vacuum harness before, but it was original. So I installed a vacuum block. I made a mount out of aluminum bar stock and mounted it using pre-existing holes in the passenger side fender. Still it wouldn't idle.

    My friend Pat suggested I run the car and stuff a rag in the throttle body and if it kept running it was getting air from somewhere else. I tried this and sure enough it kept running. The problem turned out to be either a bad intake/exhaust manifold gasket or a bad EGR gasket. I had removed the EGR valve and made a plate to cover it using aluminum bar stock but it turned out that in testing the manifold that was an issue.

    I finally got all these gremlins worked out and was ready to do some driving and start attacking the interior next.
    [B]Scott[/B] 86 GLHS #408 88 Shadow ES 92 Spirit R/T 04 SRT-4

  12. #12
    turbo addict
    Join Date
    Dec 2005
    Location
    Gettysburg, Pa.
    Posts
    1,699

    Re: 86 Shelby GLHS #408

    Looks good so far,... I'll give you $500 for it!

  13. #13
    turbo addict
    Join Date
    Oct 2007
    Location
    Rockville, Md
    Posts
    3,522

    Re: 86 Shelby GLHS #408

    Quote Originally Posted by turbojerk View Post
    Looks good so far,... I'll give you $500 for it!
    For a front wheel drive Dodge from the 80's that looks like a velvetta box? That's above market value for these things Scott, I'd take it.

  14. #14
    turbo addict Turbo Mopar Contributor
    Join Date
    Dec 2005
    Location
    Walkersville, MD
    Posts
    1,805

    Re: 86 Shelby GLHS #408

    Quote Originally Posted by turbojerk View Post
    Looks good so far,... I'll give you my 89 CSX and $500 for it!
    Fixed it for ya!
    [B]Scott[/B] 86 GLHS #408 88 Shadow ES 92 Spirit R/T 04 SRT-4

  15. #15
    turbo addict Turbo Mopar Contributor
    Join Date
    Dec 2005
    Location
    Walkersville, MD
    Posts
    1,805

    Re: 86 Shelby GLHS #408

    The next step was to get the inside of the car looking respectable.

    The dash and carpet were thankfully in very good shape. The dash just required some Armor All. The carpet I soaked with Blue Coral, got a bucket of hot water and a scrub brush, and scrubbed it. Then I vacuumed it out, let it air out with the windows down for a day or two, and it turned out great.

    The next steps I did separately but would advise doing at the same time. I actually did the headliner when I put the car on the road, but it makes more sense to do these two together. I would also advise doing this during WARM weather. The plastic is old and brittle and much easier to remove and work with on a nice hot summer day.

    To get the headliner down, you need to remove all the trim. The easiest way is to just take everything out, the Apillar trim, the trim at the top of the windshield and hatch, the Bpillar trim, and the rear sail panels. Once you get this all out you can take out the sunvisors. Then take out the dome light, which will be the last piece holding it up at that point. Then you can take the headliner out of the rear of the hatch.

    For material, in a lot of cases you can go to JoAnn Fabrics and get headliner material. However, JoAnn does not carry light gray, so I went to an upholstery shop to get a color that was almost a perfect match to the factory material.

    Get the old headliner material off and as much of the old glue off as possible off the headliner board. You can use a soft bristle scrub brush to do this. Just keep scrubbing at it and the loose stuff will come off. Don't use anything more aggressive than a brush because you'll risk tearing up the board material.

    Cut the material so you have a couple of inches hanging over the edges of the headliner board all the way around, front, rear and sides. The board isn't flat, so when you push down on the material to glue it down it will shorten up, and at that point you'll be glad you left that extra material there.

    Once you have the material ready to go the next thing you'll need is a big can of 3M headliner adhesive. You'll want to spray ALOT of glue on the headliner board AND the back of the headliner material (the foam backing). Let it set up for about 10 minutes and then carefully apply the material to the board, being careful not get any wrinkles in the material. Once attached to the board I like to just let it set up for a day before reinstalling.
    Last edited by ScottD; 01-31-2011 at 09:26 PM.
    [B]Scott[/B] 86 GLHS #408 88 Shadow ES 92 Spirit R/T 04 SRT-4

  16. #16
    turbo addict Turbo Mopar Contributor
    Join Date
    Dec 2005
    Location
    Walkersville, MD
    Posts
    1,805

    Re: 86 Shelby GLHS #408

    Before you put the headliner back in you might as well make the rest of the interior look nice.

    The plastic panels in these cars tend to yellow and look terrible over the years if the car was kept in the sunlight for any length of time. The rear sail panels can get especially faded and nasty looking.

    The miracle cure for this is SEM Warm Gray paint (15183).

    I cleaned up the panels in my car using a little soap in warm water and a soft bristle brush. Then I let them dry overnight. The next day I painted with the paint. I put 2-3 light coats on followed by 2 light coats of Krylon clear coat to protect them.

    This is an especially good thing to do with an 86 four door L body as 86s had one year only 2 piece door panels. The bottoms are vinyl which usually hold up, the top pieces are plastic which don't. Some SEM paint makes them look like brand new though. The door panel pieces were the only pieces of the interior that required masking, masking off the chrome strip by the window scraper and popping off the chrome piece that surrounds the door lock.

    Here are some pictures of a finished door handle and upper door panel.

    Once you're done painting you're ready to reinstall the headliner followed by the interior trim and you'll have an interior that looks new ... well if your seats are in good shape, which of course mine weren't.
    Attached Thumbnails Attached Thumbnails Click image for larger version. 

Name:	HPIM1141.JPG 
Views:	149 
Size:	173.4 KB 
ID:	28523   Click image for larger version. 

Name:	HPIM1139.JPG 
Views:	166 
Size:	205.5 KB 
ID:	28524   Click image for larger version. 

Name:	HPIM1138.JPG 
Views:	150 
Size:	162.4 KB 
ID:	28525   Click image for larger version. 

Name:	HPIM1140.JPG 
Views:	136 
Size:	170.5 KB 
ID:	28526  
    [B]Scott[/B] 86 GLHS #408 88 Shadow ES 92 Spirit R/T 04 SRT-4

  17. #17
    turbo addict Turbo Mopar Contributor
    Join Date
    Dec 2005
    Location
    Walkersville, MD
    Posts
    1,805

    Re: 86 Shelby GLHS #408

    The next thing that happened was I purchased my 85 Turismo 2.2. I wanted to use the KYB shocks and struts on the GLHS on the Turismo, so I sent the original Konis out to Koni to be rebuilt. It was well worth it. Here a couple pics of the Konis after getting them back and on the car. I think when all was said and done it was about 6 weeks time between sending them out and getting them back.
    Attached Thumbnails Attached Thumbnails Click image for larger version. 

Name:	HPIM0772.JPG 
Views:	142 
Size:	481.5 KB 
ID:	28527   Click image for larger version. 

Name:	HPIM0770.JPG 
Views:	137 
Size:	477.2 KB 
ID:	28528   Click image for larger version. 

Name:	HPIM0769.jpg 
Views:	139 
Size:	192.3 KB 
ID:	28529   Click image for larger version. 

Name:	HPIM0768.jpg 
Views:	136 
Size:	187.9 KB 
ID:	28530   Click image for larger version. 

Name:	HPIM0771.jpg 
Views:	138 
Size:	182.8 KB 
ID:	28531  
    [B]Scott[/B] 86 GLHS #408 88 Shadow ES 92 Spirit R/T 04 SRT-4

  18. #18
    turbo addict Turbo Mopar Contributor
    Join Date
    Dec 2005
    Location
    Walkersville, MD
    Posts
    1,805

    Re: 86 Shelby GLHS #408

    Here are some pics I forgot to put in an earlier post, a before pic of the engine compartment and some pics of the rebuilt 2.2 on the stand and the trans after girdle and moly plate installation.
    Attached Thumbnails Attached Thumbnails Click image for larger version. 

Name:	HPIM0625.JPG 
Views:	167 
Size:	25.3 KB 
ID:	28533   Click image for larger version. 

Name:	HPIM0617.JPG 
Views:	154 
Size:	20.5 KB 
ID:	28532   Click image for larger version. 

Name:	HPIM0620.JPG 
Views:	162 
Size:	17.4 KB 
ID:	28534   Click image for larger version. 

Name:	HPIM0619.JPG 
Views:	158 
Size:	16.8 KB 
ID:	28535   Click image for larger version. 

Name:	HPIM0621.JPG 
Views:	176 
Size:	20.7 KB 
ID:	28536  
    [B]Scott[/B] 86 GLHS #408 88 Shadow ES 92 Spirit R/T 04 SRT-4

  19. #19
    turbo addict Turbo Mopar Contributor
    Join Date
    Dec 2005
    Location
    Walkersville, MD
    Posts
    1,805

    Re: 86 Shelby GLHS #408

    I thought I had some pictures of the completed seats but that will have to wait for a bit as the car is at the body shop right now. I'll take those later.

    But in terms of the seats, the vinyl on the seats was able to be re-used. It was in excellent condition after cleaning it up with warm water and again a soft bristle brush.

    The seat cloth material was in sorry shape as they usually are. However, my local upholstery shop (Main Street Upholstery in Thurmont, MD) was able to source NOS material. He had the seats for about a week and they turned out GREAT. Again, I'll post pics of these later.
    [B]Scott[/B] 86 GLHS #408 88 Shadow ES 92 Spirit R/T 04 SRT-4

  20. #20
    turbo addict Turbo Mopar Contributor
    Join Date
    Dec 2005
    Location
    Walkersville, MD
    Posts
    1,805

    Re: 86 Shelby GLHS #408

    In December 2010 I decided finally to take the plunge and send the car off for paint.

    Here it is in all its stripped glory before being loaded on the dolly for transport.
    Attached Thumbnails Attached Thumbnails Click image for larger version. 

Name:	GLHS naked.jpg 
Views:	178 
Size:	365.9 KB 
ID:	28921  
    [B]Scott[/B] 86 GLHS #408 88 Shadow ES 92 Spirit R/T 04 SRT-4

Page 1 of 7 12345 ... LastLast

Similar Threads

  1. Shelby GLHS article in Shelby magazine
    By 168glhs1986 in forum Shelby Models - Whittier Factory Cars
    Replies: 10
    Last Post: 11-16-2008, 01:18 PM
  2. FS: 87 Shelby GLHS
    By Turbo224 in forum Cars
    Replies: 4
    Last Post: 06-04-2007, 04:16 PM
  3. looking for shelby or GLHS
    By 87shelby in forum Cars
    Replies: 15
    Last Post: 02-24-2007, 06:29 PM

Tags for this Thread

Posting Permissions

  • You may not post new threads
  • You may not post replies
  • You may not post attachments
  • You may not edit your posts
  •