Results 1 to 10 of 10

Thread: Homemade 3 Gauge Pillar Pod - What do you think?

  1. #1

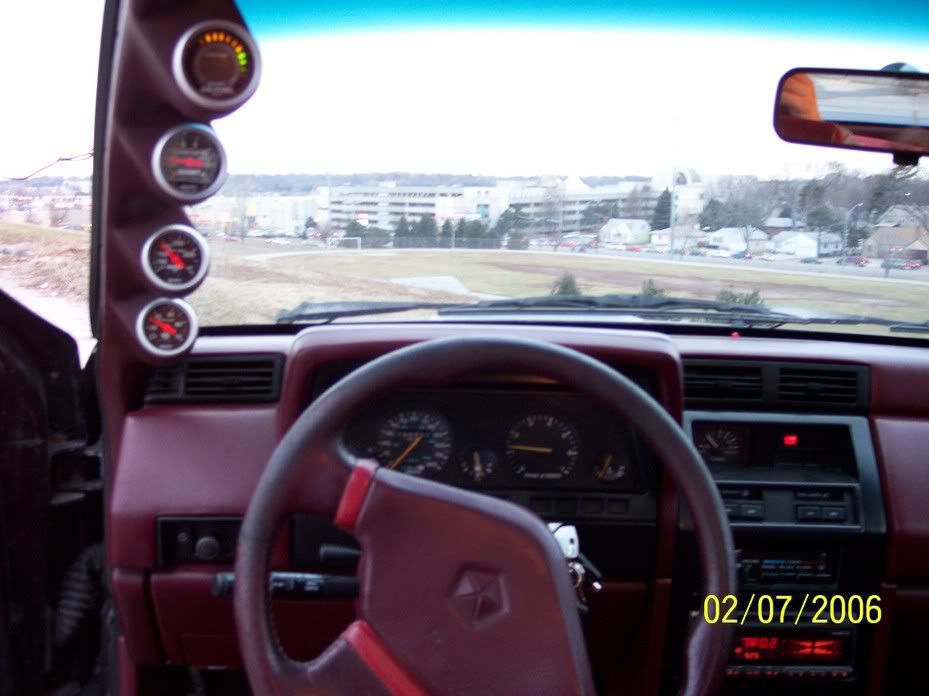
    Homemade 3 Gauge Pillar Pod - What do you think?

    I needed a place for 3 gauges - not just 2 - or I prolly would have bought the stick-on thing from Cindy. I don't think it came iut too bad ........ hard drilling the holes by hand and keeping it all lined up. The gauges are mounted in exhaust adapters covered in vinyl off of an extra cover and then all epoxied in place. What do you think?


  2. #2

    Re: Homemade 3 Gauge Pillar Pod - What do you think?

    not bad at all but i think the gaugesshould have been deeper into the trim piece and possibly a little more flush with it. But you should use some body filler to make it a bit smoother and it will look pretty good i think!

  3. #3
    Hybrid booster
    Join Date
    Jan 2006
    Location
    Rochester, NY
    Posts
    868

    Re: Homemade 3 Gauge Pillar Pod - What do you think?

    for my guage pod i used 2" heater hose

  4. #4

    Re: Homemade 3 Gauge Pillar Pod - What do you think?

    Quote Originally Posted by 86lance
    not bad at all but i think the gaugesshould have been deeper into the trim piece and possibly a little more flush with it. But you should use some body filler to make it a bit smoother and it will look pretty good i think!
    I agree but they are hitting the windshield frame now so they are as deep as possible. Also, I would have 'smoothed' them into the pillar cover but I chose to match the interior instead. The pillar covers are wrapped in vinyl and I used the extra material off of the other side to wrap the exhaust tubes. Heck, I used an extra pair of pillar covers so if I decide they don't look that good I can always go back to the original ones. Problem is, the second choice for gauge location is where the Navigator is - and I don't raelly want to lose that...........a matter of give and take I guess.

  5. #5

    Re: Homemade 3 Gauge Pillar Pod - What do you think?

    i had gauges where my navigator was in my lancer for a while. Somethin about taking my eyes off the road to check my gauages is what i didnt like

  6. #6

    Re: Homemade 3 Gauge Pillar Pod - What do you think?

    Quote Originally Posted by 86lance
    i had gauges where my navigator was in my lancer for a while. Somethin about taking my eyes off the road to check my gauages is what i didnt like
    That's reassuring to know - that was the feeling I had and why I attempted the pillar placement. I have the EGT on the top, Fuel Pressure and then Boost on the bottom - most to least important. A/F placement is another story as it is an NKG that is 3/4" digital readout.

  7. #7
    Supporting Member Turbo Mopar Contributor
    Join Date
    Feb 2006
    Location
    Edmonton AB
    Posts
    2,082

    Re: Homemade 3 Gauge Pillar Pod - What do you think?

    But you should use some body filler to make it a bit smoother and it will look pretty good
    Body filler will crack when you go to put the pillar back on the car. Been down that road before and ended up using my piece as a mold to make a complete fibreglass piece.

    Yours looks good for as far as you have come. If you want it to flow more I would suggest the filler method for the purpose of making a mold and then you can make a full piece. These pictures are not to show yours up, only show what the next step could be if so desired. Other than that good job.


    DJ

  8. #8

    Re: Homemade 3 Gauge Pillar Pod - What do you think?

    Quote Originally Posted by turboshad
    Body filler will crack when you go to put the pillar back on the car. Been down that road before and ended up using my piece as a mold to make a complete fibreglass piece.

    Yours looks good for as far as you have come. If you want it to flow more I would suggest the filler method for the purpose of making a mold and then you can make a full piece. These pictures are not to show yours up, only show what the next step could be if so desired. Other than that good job.


    DJ
    WOW! That must have been a lot of work - and nicely done I might add ! What did you make the mold itself out of?

    Like you I am learning from my mistakes and can see how the next evolution piece is better than the last. I tried going straight in and found I have slight interference w/ the WS post when I tried to install it - fits but real tight. I see yours, and retails ones, put the gauge more to the side to give it more backside clearance. Also, mine for the Lebaron are vinyl covered and I was trying to retain the original appearance which is the primary reason for not going for the blended look.

    No offence taken by the pics - actually nice to see others who have tried their hand at making one - it ain't easy - but is gratifying when you can say you did it yourself .

  9. #9
    Supporting Member Turbo Mopar Contributor
    Join Date
    Feb 2006
    Location
    Edmonton AB
    Posts
    2,082

    Re: Homemade 3 Gauge Pillar Pod - What do you think?

    What did you make the mold itself out of?
    I made the mold out of fiberglass. I made the original piece to "look" like what I wanted even though I knew it would break as soon as I tried to install it. Then I used mold realease wax (be sure to follow the directions for best results) and applied a few layers of fiberglass over my original piece. After it set I removed the original piece, which proved to be a destructive process because of the lips on the A pillar panel in a shadow. I didn't really care because all I wanted was the mold. Then I layed more mold realease in the mold and layed 2 layers of glass inside that. Once again removing the new piece was destructive to the mold for the same reasons. There are other materials to build a mold from if you want to use it over again. I filled the pin holes and imperfections and then sprayed some texture spray and vynil dye.

    It could be vynil covered with some skills but if you don't have alot of experience be prepared for a few trys or a mediocer finish. It would take some heat and good glue. Not that 3M spray can crap. That stuff turns to mush when heat is applied. Get your hands on some good Helmatine.

    I see yours, and retails ones, put the gauge more to the side to give it more backside clearance
    As far as the angle that part is good but my "cups" are more shallow than say an autometer piece, which I like better but that meant at least a portion of the backs of those two gauges are cut off. The original shape of the "cups" came from 2" PVC elbows so if something longer were used it would solve this problem.

    Anyway, that was my experience with it.

    DJ

  10. #10
    turbo addict
    Join Date
    Apr 2006
    Location
    omaha ne
    Posts
    1,538

    Re: Homemade 3 Gauge Pillar Pod - What do you think?


Similar Threads

  1. 3 Gauge panel w/ Ultra Lite Boost, water, oil temp
    By csracer in forum Parts For Sale
    Replies: 10
    Last Post: 01-15-2008, 08:29 PM
  2. General Boost Gauge: Cobalt Electric with 3 Bar MAP
    By Fast4Ward in forum Parts For Sale
    Replies: 4
    Last Post: 12-31-2007, 07:47 PM
  3. Boost Gauge: Cobalt Electric with 3 Bar MAP
    By Fast4Ward in forum Parts For Sale
    Replies: 0
    Last Post: 11-26-2007, 06:30 PM
  4. Updated: Temperature Gauge STILL Not Working - Now What?
    By DC Turismo in forum "I need help!"
    Replies: 29
    Last Post: 03-27-2007, 01:44 PM

Tags for this Thread

Posting Permissions

  • You may not post new threads
  • You may not post replies
  • You may not post attachments
  • You may not edit your posts
  •