Page 4 of 8 FirstFirst 12345678 LastLast
Results 61 to 80 of 141

Thread: X-Prize Daytona

  1. #61
    turbo addict
    Join Date
    Jul 2007
    Location
    Niagara Falls, ON
    Posts
    7,548

    Re: X-Prize Daytona

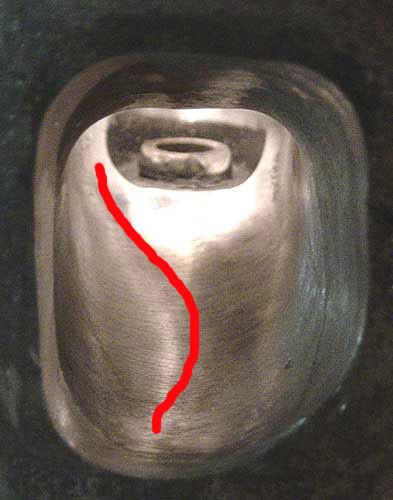
    I just had an interesting thought Mike. I know sometimes there's not a lot of material to work with, you make the best of what's there already and try to shape it better... but ideally... do the exhaust and intake valves want the same profile to the deshrouded area??? Just wondering that because flow is in opposite directions. Seems "everyone" does about the same shape around them. I can't quite tell if that's what you've got there. I'm also thinking though, that it also depends on whether you want to make better low or high lift flow. Because at low lift you're basically trying to turn it through a right angle, but at high lift it's less of an angle.
    DD1: '02 T&C Ltd, 3.8 AWD. DD2: '15 Versa Note SV, replacing.. DDx: '14 Versa Note SV << freshly killded :( ....... Projects: '88 Voyager 3.0, Auto with shift kit, timing advance, walker sound FX muffler on 15" pumpers wrapped in 215/65/R15 H rated Nexens.... and a '95 phord escort wagon PnP head << Both may need to go :( ..... I like 3.0s ... so??? ... stop looking at me like I've got two heads!

  2. #62
    Hybrid booster
    Join Date
    May 2006
    Location
    North Jersey
    Posts
    771

    Re: X-Prize Daytona

    I treat the intakes and exhausts differently. The next 2 day's posts will answer my take on that somewhat.

    I spent a little time checking out www.Hydrogen-Boost.com. I’m familiar with Fran and his work. The first listing on his testimonials page is Larry Trowbridge with an 81 MPG Saturn. I did the head and some other work on that car.

    The intake and exhaust ports first get the width of the ports matched to a jig I made up years ago.


    Then I “trench” a path on the roof (bottom of pic) from center at the manifold to the cylinder wall side inside the bowl.


    This gets blended first on the right side…


    …then the left.


    The exhaust ports get a similar treatment. I start at the center, veer to the right, then back to the left leading into the cylinder wall side of the bowl. This emulates the flow patterns of water running off the side of our mountain. Final clean-up is with a sanding roll.


    The cam journals get cleaned with 400 grit sand paper, then polished with Scotch Brite.


    I ran a tap through all the threaded holes to clean out the junk. After it returns from the machine shop it will get that process again to catch anything that lodged in the threads form the tank process. I don’t have pics of the Powre Lynz, but I can say it is a time consuming process. I had special tools made up to do the job.


    I can already smell the assembly lube!

    Much more to come,

    Mike

  3. #63
    turbo addict Murphy's Avatar
    Join Date
    Dec 2005
    Location
    Baltimore, MD
    Posts
    1,670

    Re: X-Prize Daytona

    Powre Lynz on my head. Too bad I haven't had the car running long enough at any point to really see what the head can do. Felt pretty amazing for the short time I had it on!

    95 spirit 3.0/543 15.0@91 N/A, 14.5@96 on a 50 shot RIP 87 shelby Z - project car, maybe I can drive it this year 91 spirit - roll it, chop the top, do some burnouts! RIP

  4. #64
    Hybrid booster
    Join Date
    May 2006
    Location
    North Jersey
    Posts
    771

    Re: X-Prize Daytona

    The intake bowls on the 782 heads have a machined pocket around the guide area. I used to try to blend that sucker into the rest of the bowl, but it really shouldn’t be there at all. Finally I decided to do things right and developed a process to get rid of it altogether. I made up a simple jig on the lathe (actually made a couple so I could do more than 1 bowl at a time) that allows me to epoxy in the small canyon without jeopardizing the operation of the valves. The small end goes into the guide, and the big end provides clearance around the valve. White lithium grease lets me pull it out without damaging the soft epoxy.


    The bowl is roughed up with my 12 pitch PL tool so the epoxy adheres to the metal. It gets sand blasted to remove oil residue and carbon that could cause a failure. Before applying the epoxy I clean it with Brakleen to catch any oil residue and remove the sand.


    The jig gets inserted into the guide, and a 2-part epoxy fills the gulley.


    Once set, the jig is removed and the head is allowed to set overnight.


    With the epoxy hard, I can then go in and shape it the way it should have been.


    When the head gets tanked at the machine shop, it is strapped into a machine that pulverizes it with 3000 psi cleaning fluid for about a half hour (the picture is after cleaning). If the epoxy holds up to the tank, it will hold up on the car. Having used epoxy for the past 5 or 6 years I’ve never had any issues. I’ve used the liquid JB Weld, as well as the putty type with success.

    More on the way.

    Mike

  5. #65
    Moderator Turbo Mopar Staff Force Fed Mopar's Avatar
    Join Date
    Dec 2005
    Location
    Greenville/Spartanburg SC area
    Posts
    7,559

    Re: X-Prize Daytona

    Yeah I've heard that epoxy porting works good, apparently it was started by motorcycle guys. I've been thinking to experiment with it myself.
    Rob M.
    '89 Turbo GTC

    2.5 TIII stroker, 568 w/ OBX and 3.77 FD

  6. #66
    Hybrid booster
    Join Date
    May 2006
    Location
    North Jersey
    Posts
    771

    Re: X-Prize Daytona

    Got the head back from the machine shop. Time to make things happen. First I wanted to show you more pics since I can now take them. I mentioned the Powre Lynz. These are screw threads turned into the intake ports. For a little background, about 13 years ago I was playing with a ’70 Duster. I had already modified it to get 29 MPG at the time (up from stock 17). I bought a product called the Power Plate from a guy in MN. The Power Plate is a 1” aluminum spacer that goes between the carb and manifold. It has coolant jackets for engine heat, and tapered cones under the throttle bores. These cones are on an 8 degree taper from center (16 degrees total side to side) and has 20 pitch screw threads turned in them. My Duster went to almost 45 MPG and picked up an easy 30+% power! I was blown away. My next question was, how can this be adapted to modern port fuel injected engines? Alas, the Powre Lynz concept was born.

    Most of the criteria are already present in a cylinder head. They are already heated with engine coolant, and the intake ports should have a slight taper from the manifold to the bowl and SSR. All that was needed was the screw threads. Initially I played with the 20 pitch that the Power Plate used. Later I also experimented with 16 and 12 pitch threads. What I discovered was I can tailor the pitch to the velocity zone and get even better results. I now have 2 sets of PL tools; short and long stem.

    The Powre Lynz produces a couple of physical effects. First, it creates a Variable Boundary Layer. I had a head tested by an independent machine shop at 10”, 28”, and 34” WC. I asked for 40”, but 34” was all the higher his SF-600 could go with the port. At 10”, even with my massive porting, it didn’t flow as well as stock (using a conversion factor to show what it should flow at 28”). This means the port had high velocity at low flow demands. At 28” it flowed like a respectable ported head should (far exceeding the numbers converted from the 10” test). The 34” numbers were slightly better, but not much different as 34” wasn’t that much different than the 28” conditions. At low flow, the boundary layer inflates to promote high velocity. As demands increase, the boundary layer collapses to provide higher flow.

    A second phenomenon is that liquids tend to gravitate towards the boundary layer. As liquid droplets hit the heated textured walls, they either bounce off in dozens of smaller droplets, or adhere to the screw threads, wicking out radially for increased surface area for much better vaporization (remember, liquid fuel doesn’t burn). Thirdly, it creates an active port that aids homogenizing of the fuel with the air. These and many other principles and skill sets are covered in Head Porting for Performance & Economy (FuelEconomyTips.biz).

    This head got a 12 pitch from the manifold to about ¾” in. The rest of the port is 16 pitch…


    …with the exception of the short side radius, which I hit with the 12 pitch Lynz tool.


    The reason is any liquid “river” will tend to flow across the SSR. The 12 pitch Lynz will kick it back up into the higher velocity zone where it can be better vaporized and homogenized with the air. Again, the back sides of the intake valves get Ringz turned into them to take the Powre Lynz principle even further (see previous post). Here is a shot of the finished combustion chamber.


    Over the years I’ve ported many heads and posted lots of pictures. About 4 years ago I shifted gears and went full-time fuel economy. Recently I decided to see what people were saying about me and did a couple searches on “mpgmike” and “Powre Lynz” on the net. I found I was quoted by guys that had absolutely no clue, trying to justify stupidity by haphazardly adding their version of Powre Lynz, Somender Singh Grooves, dimples, and on and on to a total botch job. The kicker is they would often quote me to justify their claims! These are tools; or put another way, Band-Aides. When the factory head has flaws not easily ported away, these tricks can compensate and add tremendous performance to the design. Notice I did NOT use the Somender Singh Grooves on this head. Why? Because with the radical radiusing combined with the targeted low 18 psi boost, they shouldn’t be needed. [I’ve been dying to requite myself on this one.]

    With the head once again in my possession, there’ll be lots more to come.

    Mike

  7. #67
    Moderator Turbo Mopar Staff Force Fed Mopar's Avatar
    Join Date
    Dec 2005
    Location
    Greenville/Spartanburg SC area
    Posts
    7,559

    Re: X-Prize Daytona

    Yeah I'll admit I've been pretty skeptical of your mods, but the more I researched things and looked at your heads, I have begun to believe you are onto something. So I will say this is a very interesting build to me. I would love to have my cake and eat it too

    I am kinda glad to see no Somender groove too, as it can be added later and give a true A/B result of how much it actually helps. Which is maybe your intention?
    Rob M.
    '89 Turbo GTC

    2.5 TIII stroker, 568 w/ OBX and 3.77 FD

  8. #68
    Supporting Member Turbo Mopar Contributor zin's Avatar
    Join Date
    May 2006
    Location
    ca
    Posts
    4,479

    Re: X-Prize Daytona

    I've been pretty skeptical as well, but since you've explained what is supposed to happen, it makes sense, though I can see it making much more difference on a carb'd intake than the FI, at least from a MPG stand point. Seems like the added "residence time" on a carb'd application would go far towards fully vaporizing the fuel, not just atomizing it...

    While I get the concept, I still have a bit of trouble with the idea that the lines/ribs in the port actually provide enough surface turbulence to make the air "see" a smaller/higher velocity port at low flow and still "flatten out" as the flow/RPM increases... BUT, just because I haven't seen it with mine own eyes doesn't mean that's not what's happening.... If it is, I can see how it would drastically improve performance across the board, assuming port sizing is done correctly for the mods.

    All that said, I'm going to take your word for it, from what I've seen you've been doing this a long time and for pay, which is saying something!

    Looking forward to additional info...

    BTW, do you have a link to the rules for the X-prize in question? I went to the site and it was baffling in that respect. I'm curious as to what restraints they may have on what is done...

    Mike
    "The Constitution is not an instrument for the government to restrain the people, it is an instrument for the people to restrain the government - lest it come to dominate our lives and interests." - Patrick Henry

    Bad laws are the worst sort of tyranny.
    - Edmund Burke

  9. #69
    Hybrid booster
    Join Date
    Sep 2010
    Location
    lower rainland b.c
    Posts
    409

    Re: X-Prize Daytona

    think golf ball. it uses the same principle for boundary layer to make the ball have a lower drag coefficient just by reducing the turbulence wake. nasa also made a delta winged f-16 that experimented with a micro textured wing to show the effects on an aircraft, at lower speeds, the boundary layer artificially expanded the wings chord (the thickness at the aerofoils maximum) giving more lift and better low speed characteristics, but at high speed the layer collapses and the wings actuall thickness would allow it to slice through the air faster, giving all the benefits to what a thin wing can do at high speed. this technique also exploits laminair flow characteristics due to using turbulence to help "bond" the airstreams flow. this porting technique has priciples that have pretty deep roots in aeronautics it would seem. im looking fwd to seeing the final products results.

  10. #70
    The moderately moderate moderator Turbo Mopar Staff
    Join Date
    Dec 2006
    Location
    Akron, Ohio
    Posts
    6,870
    Hey Mike, would a diode of some sort do the same as the coil or is that only when the electricity stops like in an A/C compressor coil?

    Sent from my DROID X2 using Tapatalk
    Bryan
    86 GLHS #161, 2016 Impala
    SDAC National Member, SDAC Buckeye Chapter Member

    A man has got to know his limitations.....

  11. #71
    Hybrid booster
    Join Date
    May 2006
    Location
    North Jersey
    Posts
    771

    Re: X-Prize Daytona

    Zin, this "residence time" you reference is why I really like the TIII heads. The intake ports have to be 3X longer than most others. The X Prize was officially complete as of July of 2010. I'm just playing in the aftermath. If there were links to rules, they're probably long gone. Diodes are electricity check valves. They allow current flow in one direction but not the other. No diode could substitube an ignition coil, which is a transformer/inductor. An inductor initially resists the flow of current until fully charged, then when discharged, all the stored energy is shot out. A capacitor will freely pass AC electricity but block DC, while an inductor will freely pass DC electricity but block AC current flow.

    While I was porting the head, I removed the casting irregularities from the oil drain-back areas. A friend that I did a considerable amount of work for recently changed the oil in his Daytona. He used the big 5 quart jug and dumped. After starting the engine, it smoked. It only has 5k miles and was put together right. He started pulling things apart, ran a compression test, and bunches of other time-wasters trying to find the problem. After a few phone calls we figured out that he poured the oil in faster than it could drain out of the head. Essentially he filled the head with oil! The oil made its way into the PCV system (and probably other places) and got sucked into the engine when he started it. Getting back to this head, by removing the casting flash, oil can more easily drain out of the head and back into the block. (I did port my friend’s head several years ago, but I don’t think I included this trick.)


    Basic assembly of the head is, well, pretty basic. I apply white lithium grease to the spring rings to hold them in place as I assemble the head. New valve stem seals are installed. The springs and other hardware are cleaned and installed. I use assembly lube on the valve stems and cam journals. The lash adjusters and cam followers are soaked in oil for a half hour, then worked back and forth while still in the oil prior to installation. A small dab of silicon sealer is applied to the corners of the end cam caps around the seal & plug prior to torquing them down. Nothing radical here. Springs are stock turbo units, and the cam is a roller from an ’89 TBI 2.5 car.


    As a side note, I have buckets of parts from heads I trashed over the years. Digging through I thought I’d share what a good lifter looks like compared to a well worn one. This doesn’t mean it works well internally, though.


    I happened to score a set of NOS exhaust manifold studs. Normally I apply Permatex Set And Seal thread locker to the studs when I install them. As you can see the new studs already have the sealer on them.


    I install them with a stud extractor/installer tool.


    Since I’m using the newer style E-coil, I pulled it apart to clean it up.


    I’m using the Turbos Unleashed thermostat housing. Here it is with the coolant sensor, turbo coolant fitting, coil, and anodized top hole plug.


    More to come.

    Mike

  12. #72
    turbo addict
    Join Date
    Apr 2006
    Location
    omaha ne
    Posts
    1,538

    Re: X-Prize Daytona

    You sir, have been very helpful to me. Im excited to see the finished results. Good work!

  13. #73
    Moderator Turbo Mopar Staff Force Fed Mopar's Avatar
    Join Date
    Dec 2005
    Location
    Greenville/Spartanburg SC area
    Posts
    7,559

    Re: X-Prize Daytona

    I'm surprised you didn't use beehive springs?
    Rob M.
    '89 Turbo GTC

    2.5 TIII stroker, 568 w/ OBX and 3.77 FD

  14. #74
    The moderately moderate moderator Turbo Mopar Staff
    Join Date
    Dec 2006
    Location
    Akron, Ohio
    Posts
    6,870
    Thanks Mike
    I knew they were a check valve, but didn't know if it could be used in your situation. I didn't know if they would work with my limited knowledge of components.

    Sent from my DROID X2 using Tapatalk
    Bryan
    86 GLHS #161, 2016 Impala
    SDAC National Member, SDAC Buckeye Chapter Member

    A man has got to know his limitations.....

  15. #75
    Hybrid booster Turbo Mopar Contributor
    Join Date
    Jan 2006
    Location
    EauClaireWisconsin
    Posts
    638

    Re: X-Prize Daytona

    I couldn't pry myself away from this thread once I started reading it. This stuff is fascinating and I am excited to see how well it works. I love how you are explaining the theory behind each modification. Thanks Mike!

  16. #76
    Hybrid booster
    Join Date
    May 2006
    Location
    North Jersey
    Posts
    771

    Re: X-Prize Daytona

    I have the beehive springs, but not the retainers. I also have the PT Lifters but not the washers. For low RPM I don't think these upgrades would make that much of a difference. As for how well things are explained, I already have my Tuesday post done and will be drafting Wednesday's post later today. I spend time reading and revamping for hours prior to posting. I'm trying to use this platform as a way of introducing fuel economy, more specifically combustion efficiency to my friends at TM. So far it appears to be having a positive effect.

    After installing the valves and cam gear, the manifolds and turbo were bolted on. With the head assembled, time to put things together. The plan is to install the block in the car first, then install the head after the fact. I’m working on the grass next to the shop, so too much weight makes it hard to maneuver the cherry picker. I laid plywood down to at least make it possible to move around. The shop has a dirt floor and cars in both bays, so it doesn’t matter either way. To prep the block, the head bolt holes all get the threads chased and blown out with compressed air.


    The engine has been sitting under my bench for the past 4 years. The liquid coolant is long gone. All that was left of it was a dry powder that I blew out with the air nozzle.


    I wiped the bores down and sprayed them with WD-40. After wiping the excess spray from the top of the block, I sat the head on with 1 head bolt to keep it from tipping over and got everything indexed and clocked.


    I clocked the compressor housing, aimed the hoses and fittings, bolted on the wastegate, and so forth. The head then came back off and the engine stand got wheeled out to the car, along with the cherry picker. After the cherry picker was supporting the block, the engine stand came off and the sheet metal plate, flywheel, and clutch went on. In she goes!


    Wouldn’t you know it, I ran out of daylight before getting to the head. Block is covered with plastic and rags in case it rains. Back to business again later.

    Mike

  17. #77
    Boost, it's what's for dinner... Turbo Mopar Staff Aries_Turbo's Avatar
    Join Date
    Dec 2005
    Location
    Warsaw, NY
    Posts
    8,839

    Re: X-Prize Daytona

    Quote Originally Posted by mpgmike View Post
    To prep the block, the head bolt holes all get the threads chased and blown out with compressed air.
    is that a cutting tap or a thread cleaning tap?

    if its a cutting tap, i suggest not using it as it can weaken the threads by removing more material.

    brian

    Quote Originally Posted by turbovanman
    This one is easy, I have myself to blame, I rush things, don't pay attention to gauges when I should, change to much stuff at once then expect miracles, the list is endless.

  18. #78
    Hybrid booster
    Join Date
    May 2006
    Location
    North Jersey
    Posts
    771

    Re: X-Prize Daytona

    As fate would have it, I’ve run into a financial crisis and have to sell the X-Prize Daytona! Unfortunately it isn’t finished. So I’m tossing out an offer that someone should find just too sweet to refuse. I made claims of 70+ MPG and at least 13.99 quarter mile times (better than a stock 340 Duster). Removing the astronomical claims from the equation, this car in finished working condition should be worth an easy $4500. If it really does live up to the claims, just for the bragging rights alone it should be worth $7500. (Where can you buy a 13 second, 70 MPG car this size at any price?!?) So here’s the deal. I need money to finish the car and take care of an obligation. If this car just keeps you awake at night and you’d love to own it, you put down $4500 and give me an end-of-year deadline to have it finished. At that time, YOU drive the car about 100 miles or so and see what the mileage is. If it isn’t at least 70 MPG, you own the car. If it does better than 70 MPG, we check performance. I have a Passport pocket dyno that suction-cups to the windshield and plugs into the cigarette lighter. Not exactly a time slip, but indicative of quarter mile potential. If it doesn’t dip into the 13’s or better, you own the car for the $4500. If it does perform in both categories, you remit the remaining $3000 balance and drive the car home. Sound good so far?


    As an added bonus, there are technologies going into this car I cannot disclose publicly, as they came from outside professional research I’ve been involved with (an intellectual property rights thing). I briefly mention certain things but don’t go into particulars. I will disclose to the new owner of the car all the high-tech principles employed, plus share a slew of literature that isn’t widely circulated. I have a 5 DVD set from a fuel economy class I used to teach regularly I’ll also toss in. We sold them for $1200 at one time. (In fact, I have at least 3 left, so if someone else wants one for $400 shipped, let me know.) Hey, not only do you get the car, but you get a crash-course on how it’s done! Furthermore, I’ll personally work with you to modify your daily driver for 30%, or even 50% better fuel economy (perhaps more if you catch on quickly). As a side note, I have been directly or indirectly responsible for dozens of vehicles getting at least double the mileage (100% increase).

    The burning question is why should you trust me? Well, I’ve been part of this community for the past 6 years, have done work for dozens of forum members (and many others in other special interest communities), have attended events, worked with other vendors, and as time permitted, contributed to the discussions. I stand behind my work, and my word is my worth. My track record is why I can be trusted. Ask around if you want.

    I intend to continue regular posts and keep the information flowing, unless the new owner objects. Of course, you will want to talk with me about many things as you make your decision. I wouldn’t have it any other way. Send me an email or PM with your phone number and preferred times to call and I’ll call you. (I don’t want to post my phone number on the board.) This may be your one-time shot at something this radically unique (the proverbial “Once-in-a-lifetime deal”).

    Mike Holler
    mpgchris@yahoo.com

  19. #79
    Moderator Turbo Mopar Staff Force Fed Mopar's Avatar
    Join Date
    Dec 2005
    Location
    Greenville/Spartanburg SC area
    Posts
    7,559

    Re: X-Prize Daytona

    I guess the big question to most is gonna be what shape is the body in?

    All things aside, I will say that I have never seen anybody complain or leave bad feedback about Mike, in all the time I've been on the forums, which is close to 10 years now.
    Rob M.
    '89 Turbo GTC

    2.5 TIII stroker, 568 w/ OBX and 3.77 FD

  20. #80
    Hybrid booster
    Join Date
    May 2006
    Location
    North Jersey
    Posts
    771

    Re: X-Prize Daytona

    There is minor surface rust from the faded paint on the RR 1/4 panel, there is a small circle on the bottom of the right door where the paint chipped and got a little surface rust, and there is a little rust on the bottom of the left door where the skin wraps around the door structure. The floors and frame are all awesome. I suppose I could crawl around and snag more pics. Thanks for the kind words.

    Mike

Page 4 of 8 FirstFirst 12345678 LastLast

Similar Threads

  1. how many referrals before I win a prize?
    By 93sundance in forum Board Discussion
    Replies: 4
    Last Post: 02-19-2008, 08:24 PM
  2. SDAC 17 Pre-registration Prize!
    By Lugert in forum SDAC Events
    Replies: 29
    Last Post: 07-02-2007, 05:10 PM

Tags for this Thread

Posting Permissions

  • You may not post new threads
  • You may not post replies
  • You may not post attachments
  • You may not edit your posts
  •